Adding TLS/SSL to a web service with Nginx
As I previously mentioned, it is almost always better to use a battle-hardened old favourite for security software, rather than to roll your own.
With Nginx, you can add SSL/TLS support in front of your web server, using tried and tested software.
I'm using Ubuntu, but the process shouldn't be too different on other *nix OS's - the differences will likely be the package manager (apt), and possibly the service manager (systemd).
We'll start by setting up Nginx to just forward requests, without SSL/TLS, check that that works fine, and then add SSL/TLS.
A Basic Nginx Config
First, install Nginx, and unlink the default configuration.
sudo apt install nginx
sudo unlink /etc/nginx/sites-enabled/default
Add a file at the location /etc/nginx/sites-available/server.conf, with the following contents:
upstream my_service {
        server localhost:8083; #Assuming that you are running a server on port 8083
}

server {
        listen 80 default_server;
        server_name localhost; #Use your domain name here

        location / {
                proxy_pass http://my_service/;
        }
}
Then create a symlink to our new server config file from /etc/nginx/sites-enabled/ - this will tell Nginx to load our configuration. Use nginx -t to check the configuration is valid, and then restart the service.
sudo ln -s /etc/nginx/sites-available/server.conf /etc/nginx/sites-enabled/
sudo nginx -t
sudo systemctl restart nginx
Now, if we use curl to make requests to both our original server's port 8083, and the port that nginx forwards to our original port (the default http port, port 80), we should get the same response from eac from eachh.
curl http://localhost:8083
curl http://localhost
As I am running my simple Racket server on port 8083, I get a response of "Hello World!" to both requests.
Getting an SSL Certificate
Before this step, you need to either create a self-signed certificate, or acquire a certificate signed by a certificate authority.
For my personal projects, I have used CloudFlare, but there are many providers of SSL certificates out there. For this example, we will simply self-sign the certificate - this works (almost) fine for local testing.
We need openssl, install that:
sudo apt install openssl
And then generate the key:
sudo openssl req -x509 -out /etc/ssl/certs/localhost.crt -keyout /etc/ssl/private/localhost.key -newkey rsa:4096 -nodes -sha256 -days 365 -subj "/CN=localhost"
The command needs to be run with sudo only because the locations to which it saves the certificate and key are protected.
Params Breakdown:
x509specifies the certificate typeoutandkeyoutspecify where to save the certificate and keynewkey specifies the key typenodeswill cause the key to have no passphrasesha256specifies the hash algorithmdaysspecifies how long the certificate should lastsubjis used to add information about the host to the certificate, here we are adding the bare minimum - just the domain name
Configuring Nginx to use the Key and Certificate to encrypt traffic with TLS
Now we have key and certificate files, we can add them to our server config file. We will also have to change the port from port 80 to port 443 (http is on port 80, but https is on port 443)
upstream my_service {
        server localhost:8083; #Assuming that you are running a server on port 8083
}

server {
        listen 443 ssl default_server;
        server_name localhost;
        ssl_certificate /etc/ssl/certs/localhost.crt;
        ssl_certificate_key /etc/ssl/private/localhost.key;

        location / {
                proxy_pass http://my_service/;
        }
}
And then restart nginx:
sudo systemctl restart nginx
Now try making a request to server:
curl https://localhost
You may get the following warning: curl: (60) SSL certificate problem: self signed certificate
If so, try again with the --cacert flag set to the previously created certificate:
curl https://localhost --cacert /etc/ssl/certs/localhost.crt
This should return a result from the upstream server.
Testing it in the browser
If you visit https://localhost/ in your browser, you should get a slightly scary warning page, something similar to the following:
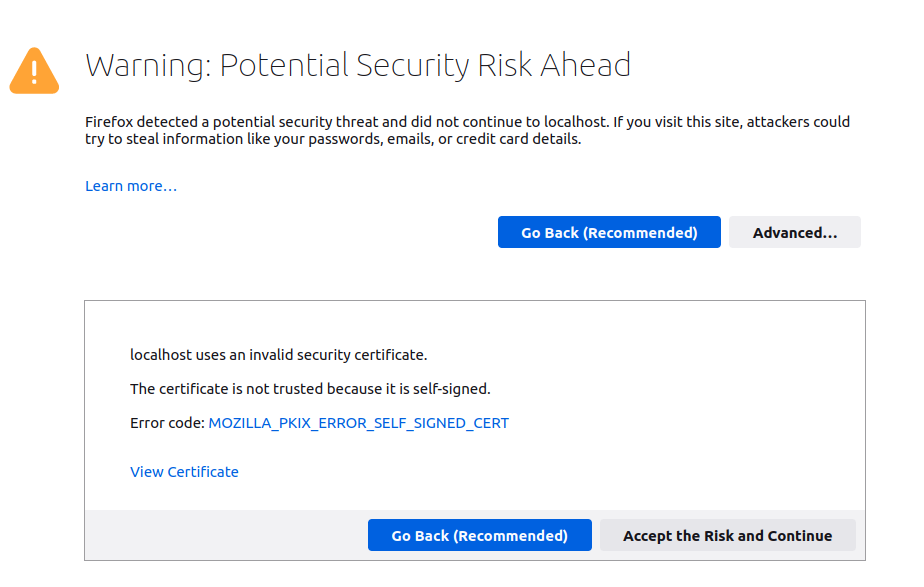
This warning occurs because we signed our own certificate. If you click Advanced..., and then Accept the Risk and Continue, you should see the response from the upstream web server displayed:
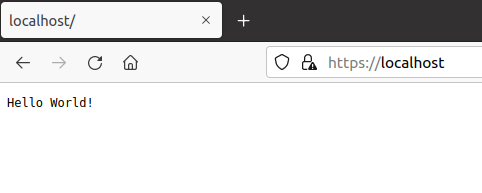
And we're done!
In production you will most likely want to change the server_name value from localhost to your domain name, and acquire an ssl certificate and key pair created by a recognised certificate authority.
I'm not going to advertise any single provider here, there are plenty to choose from. Free solutions are available from Let's Encrypt and CloudFlare, but these are far from your only options.